So you have an artistic eye. You see the world in ways that are unique, interesting, and different. You want to share this world view through your photography… but one of the greatest frustrations new photographers encounter is that when they get back to their computer and pull images off the camera, the results are nothing like the grand vision they experienced while shooting. Has this ever happened to you? I should emphasize that the tips I’ll share here are like a double edged sword: you can use them to more accurately portray your inner vision of a shot, or they can be used to accurately reproduce exactly what your eye physically observed. Frequently, these are definitely not the same thing.
Here are 10 great tips to help you actually capture what you see:
1: Decide on a clear center of attention
What is it about what your eye sees that is so interesting? Is it a specific object? Is it the positioning of several elements in view? Is it the colors you see, or how they interact? You know what is interesting, so frame the shot to omit distractions and noise. Remember that someone who sees your picture later won’t know about anything that is not in the frame, so leave as much to their imagination as you can. For example, if you are taking a picture of a child running at a park, move yourself around so that you don’t also have a soccer game or playground competing for attention in the shot. Let the person viewing the shot imagine that the child is just running through an open field, making the imagery stronger.
2: Remember that your eye has a better dynamic range than your camera
Dynamic range has to do with how well you can see the extremes of lights and darks at the same time. The human eye is capable of very high dynamic range, allowing us to clearly see a very dark subject against a very bright background. Cameras, on the other hand, have a much lower dynamic range. This can make it nearly impossible to get your camera to capture what you see, because you simply see much better than your camera does. Here is an example of what I’m talking about.


The image on the left has the ocean nicely exposed, but the subject is totally in silhouette. The image on the right was taken with nearly the same camera settings but I used my speedlite as a fill flash to get the subject’s face brighter – closer to the brightness of the ocean behind her.
3: Aperture control for DOF
Most photographers quickly figure out shutter speed and ISO, but fewer seem to grasp the power of the aperture settings on their camera. I could easily dedicate an entire post to the topic of aperture control, but for now I’ll sum it up like this: A wide aperture (small F number) will produce a very narrow depth of focus. A very small aperture (large F number) will produce a very deep depth of focus. What does this mean? This means that you can control how out of focus as well as how bright the non-subject portions of your shots are. Let me illustrate with an example:
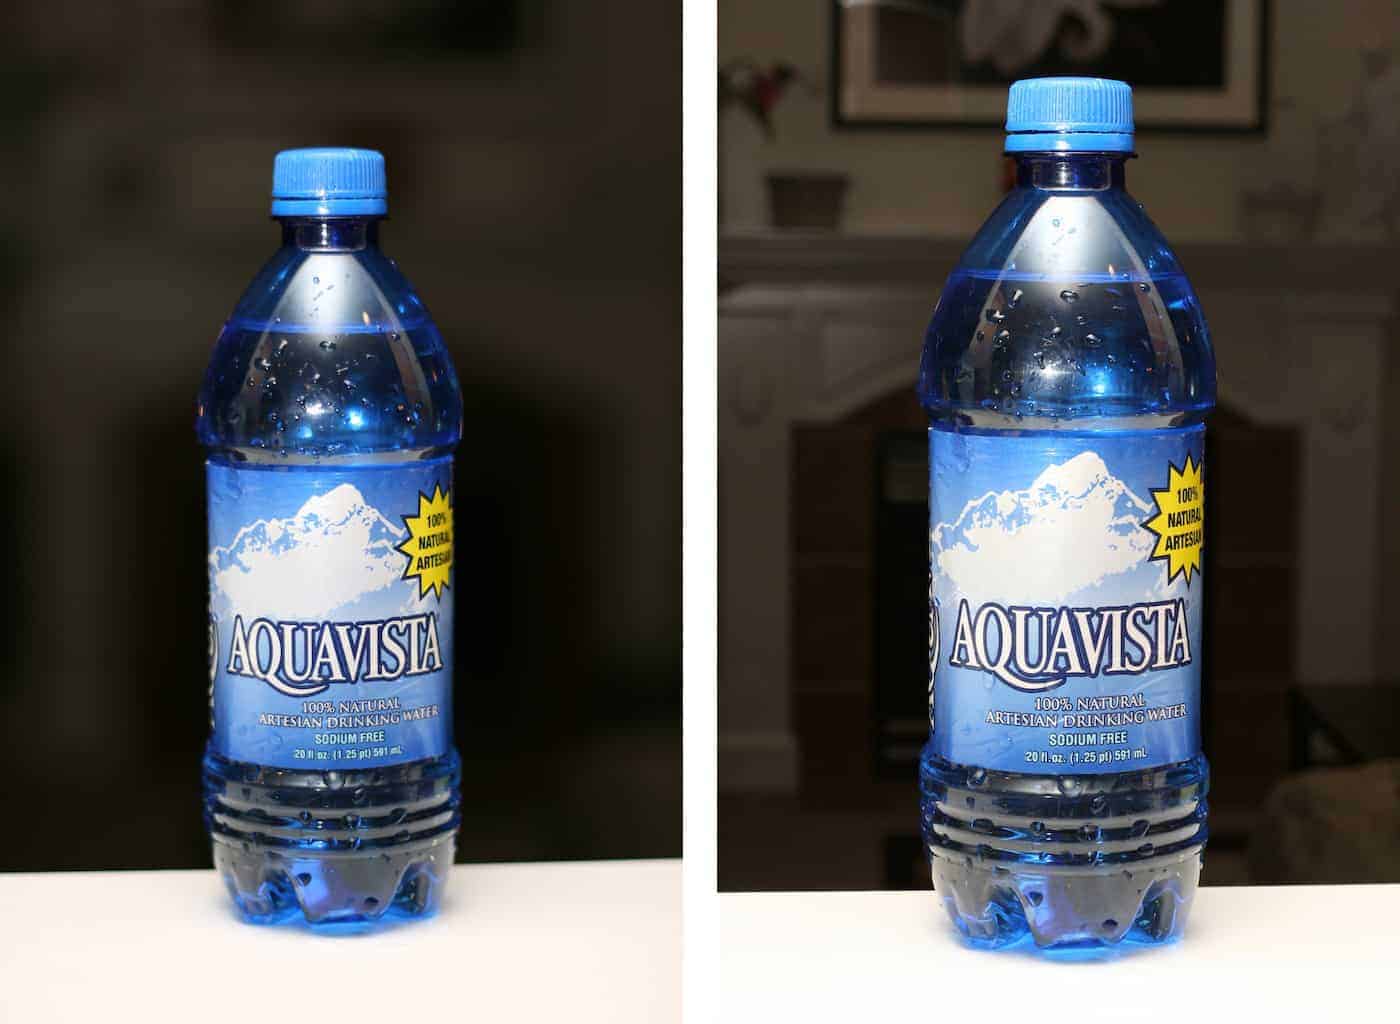
For these shots, I just grabbed a bottle of water and put it on my kitchen counter. Both used a bounced flash, but I had to tweak the power of the flash and the ISO to get the exposures similar (see the bit about the Exposure Triangle below). The shot on the left used an aperture of 1.8, the one on the right used an aperture of 11. Notice how the one on the left has such a shallow depth of field that even the label on the bottle is out of focus and beginning to darken because it is a few centimeters farther away than the front face of the bottle. If you really want to help bring your subject out of a background of chaos, use a wider aperture. If you want to get more elements of your shot in focus, with a more evenly distributed exposure, use a tighter aperture.
4: Careful composition to either expand upon or contract the feel of the photo
This technique will possibly have some of you shaking your heads in disgust, because I’m going to ask you to actually move your FEET while shooting. Many novice photographers rely far too heavily on the fact that their camera has a zoom, and sacrifice a whole range of composition possibilities because they refuse to move their feet to get closer to or farther away from their subject. Now don’t get me wrong, I’m all in favor of using that fancy zoom you’ve got – but I want you to understand what it is doing. When you zoom in, you not only get the subject to appear larger, but you cut out much of the background that may possibly be part of what you wish to capture. Sometimes it is better to zoom farther out and move your feet closer to the subject. This will make your subject larger but capture more of the surroundings to better portray what your eye sees. The opposite is also true, of course. You can use your zoom to carefully decide what part of the background you want to have visible…Sometimes you’ll need to zoom in on the subject but move farther away from them to get the composition you want.
5: Be ready – moments come and go quickly
I can’t count the number of times I’ve been in a perfect position to capture a truly memorable image, but had my camera in my bag. Or turned off. Or on the wrong settings. Some shot opportunities only last a second or 2, and if you don’t have your camera in your hand, turned on, and set to reasonable settings you may miss it. When I’m shooting, I’ll frequently (as in a few times a minute) double check my camera settings. I’m constantly adjusting the exposure triangle to fit what I’m shooting so I can be ready when the opportunity arrives.
6: Understand the exposure triangle
There is no shortage of great images explaining the exposure triangle on the interwebs. Here is a brief summary of the 3 parts of your camera’s exposure:
ISO: This sets how “sensitive to light” your camera becomes. A higher ISO number means the camera will be more sensitive so you can use a faster shutter speed or smaller aperture, but will also be progressively more grainy with higher and higher numbers.
Shutter Speed: This sets how long your shutter will stay open, letting light hit your sensor. Slower shutter speeds will produce motion blur if anything in your image is moving, but they let in much more light allowing for a lower ISO or tighter aperture. Faster shutter speeds can “stop time” and make even quickly moving objects appear to be frozen, but they let in much less light, so you’ll need to compensate with a larger aperture or a higher ISO.
Aperture: The “aperture” of your lens is much like the iris of your eye – it can be opened very large to let in a lot of light, or it can be opened only a tiny bit to let in only a very little amount of light. As I discussed above, a wide aperture will produce a very shallow depth of field, while a smaller aperture will produce a much deeper field of focus.
It should be obvious that ISO, shutter speed, and aperture all affect each other. If you open your aperture, you’ll need to speed up your shutter or use a lower ISO. If you change your ISO, you’ll need to adjust either your shutter or aperture (or possibly both) to compensate to get the right exposure. Just as in the shots I took of the water bottle above, I had to make multiple adjustments to the other aspects of my exposure when I changed the aperture size between the 2 shots. Once you have mastered the exposure triangle, you can leverage the parts of the triangle to more accurately capture what you see.
7: P is not for “Professional”
So you went and spent a bunch of money on a really expensive camera – that will make your photos instantly professional looking, right? Well, I’m sorry to say it but no. An expensive camera in the hands of an amateur will still produce amateur shots. Most DSLRs I’ve seen in recent years come with a fully automatic setting, and several semi-automatic settings, as well as full manual. I’d recommend learning how to use your “Aperture Priority” as well as “Shutter Priority” settings, then move on to get comfortable in full manual. Learning how to use your camera’s full manual mode will provide you the power to capture what you see.
8: Pay attention to your light sources

When you take a picture, you are really just capturing light, so you need to be able to pay attention to all your light sources and understand how they will interact with the mechanics of your camera. The most common pitfall here is when shooting with the sun slightly in front of you but off to one side. This will frequently produce “lens flare” that is not really visible through the viewfinder when shooting, but will ruin your shot. However, there are much more subtle ways that light can do funky things with your equipment. On a recent shoot, we draped Christmas lights over a little girl and took a few shots of her looking all mischievous.
At first I thought the extra dots were the lights actually shining on the wall, etc. Then I realized I still had a polarizing filter on my lens from earlier in the day when we were outdoors in bright sunlight.The extra dots were actually a reflection of the Christmas lights off the front of the lens being reflected off the back of my filter, and even though the camera was picking them up well, they were so faint that I could not see them in the viewfinder. Removing the filter took care of the problem.
9: Always check your camera settings
I like to say that “leftover settings produce leftover shots”. I’ve had plenty of shots ruined because I pulled my camera out of my bag to start a shoot on a nice sunny day and forgot to check the settings, which were last used on a very dark, overcast day. I’ve had to learn the hard way to check my camera settings before I start shooting at each setting.
10: Practice!
We’ve all heard that practice makes perfect – but I prefer the adage that perfect practice makes perfect. Photography is an art form that requires a lot of mental thought be put into every shot – I’d recommend practicing each of the previous tips one at a time until they all become second nature and you can easily do them all at the same time. Then you’ll be armed with the tools you need to truly capture what you see.
Have you found this post to be useful? I’d love to hear your comments (good and bad!) so leave your thoughts below!
Leave a Reply